


INTRODUCTION
A large react application consists of a bunch of methods, components, and third-party libraries. If you don't do anything to make sure that those different part load only when they are needed, a huge bundle of javascript would be shipped to your users as soon as they open your website and this would affect your app performance significantly so what we do to avoid this is code splitting
What is code splitting?
React uses webpack and babel to ship a whole chunk of javascript to the browser. This is known as bundling. This simply means React bundles a huge chunk of javascript alongside external libraries into a single file and ships it to the browser. As more features are added to an application, this huge chunk of code quickly adds up to one large file.
Code splitting helps to solve this problem by shipping only the code that the user needs to the browser. Code splitting creates multiple files and ships them to the browser as required by the user. On the initial load of the app, one of the files will be loaded and the rest will be loaded on demand by the user.
For example in the image below, we see the developer's tools sources tab, and we see a static folder, inside that static folder, there’s a js folder that contains a js file on the initial load of the app.
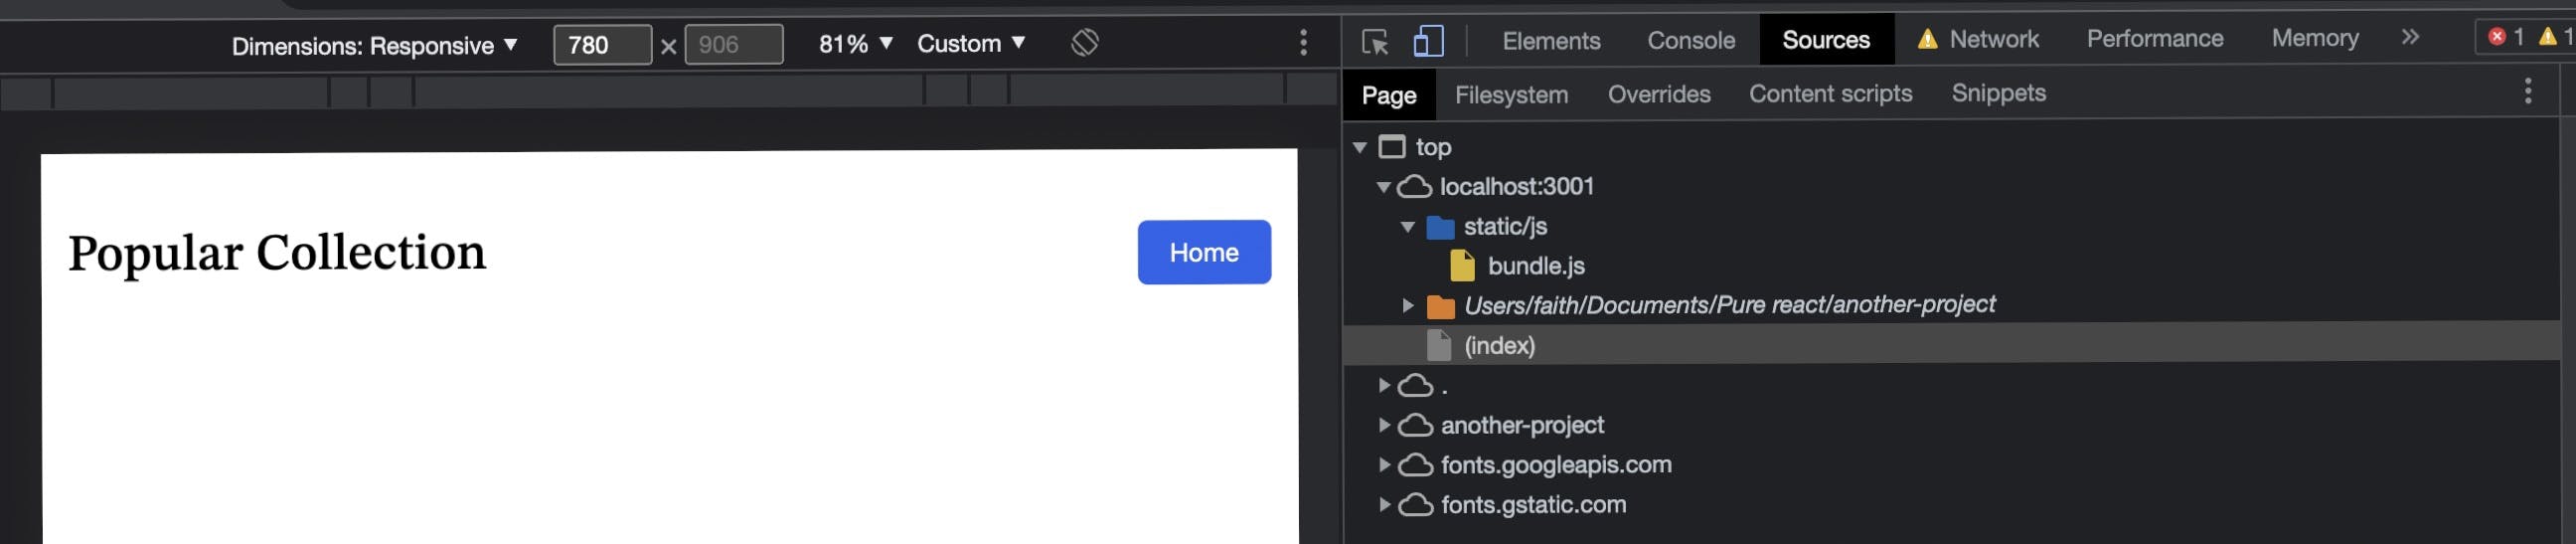
On clicking, the home button in the react app, we are directed to a new page and then another js file is loaded and added to the static/js folder in the source tab.

Consequently, as a user interacts with the app, the needed code at that moment is added to the browser just as seen in the image above. In the next section, we will see how to implement this.
How to implement React lazy loading
We use the react lazy loading feature for splitting our code. You can use React.lazy without any additional configuration. Here is what you need to do:
Step 1: Change your import to React.lazy
Instead of importing the component that should be lazy loaded the traditional react way, import it this way:
// traditional way of importing components( React )
import Images from ‘./Images’;
const App = () => (
<div>
    <Images />
</div>
)

//Importing With React.lazy()
const Images = React.lazy(() => import("./Images"));
const App = () => (
<div>
    <Images />
</div>
)
Note: You can't use named exports with React.lazy, it currently only supports default exports. So something like the following won't work:
const { Images } = React.lazy(() => import('./Images'));
Step 2: Wrap the component in React Suspense
Any lazy-loaded component needs to be wrapped in React's Suspense component.
This wrapper renders a specified fallback component that will be shown while the component is loading. It serves as a loading indicator while the component is being lazy loaded:
import { Suspense } from "react";
const Images = React.lazy(() => import('./Images'));

const App = () => {
  return (
    <Suspense fallback={<span>Loading...</span>}>
      <Images />
    </Suspense>
  );
};
And that is how you lazy load components in React. Pretty easy, right?
Code splitting routes with React lazy
Another easy way to optimize the bundle sizes of your application is to lazy load an entire page of your application. This simply breaks down your application into chunks per route, then loads that chunk when the user navigates that route. To do this, simply convert all route components in your app to lazy components and wrap them in a Suspense component;
import { Suspense, lazy } from 'react';
import { BrowserRouter as Router, Route, Routes } from 'react-router-dom';
const Home = lazy(() => import('./routes/Home'));
const About = lazy(() => import('./routes/Cart'));
const App = () => (
  <Router>
    <Suspense fallback={<div>Loading...</div>}>
      <Routes>
        <Route exact path="/" element={<Home/>}/>
        <Route exact path="/cart" elementt={<Cart/>}/>
      </Routes>
    </Suspense>
  </Router>
);
Error handling
For one reason or the other, our component may fail to load properly. This might be due to a slow network, runtime errors during rendering, etc. To prevent pitfalls like this, we create a ErrorBoundary component. Error boundaries are simply React components that catch javascript errors, log those errors and display a fall-back UI.
There is more than one ways to implement error boundaries. It could be class based error boundaries, For example:
class ErrorBoundary extends React.Component {
  constructor(props) {
    super(props);
    this.state = { handleError: false };
  }

  static getDerivedStateFromError(error) {
    // Update state so the next render will show the fallback UI.
    return { hasError: true };
  }

  render() {
    if (this.state.hasError) {
      return <h1>Something went wrong.</h1>;
    }

    return this.props.children;
  }
}
To learn more about class-based error boundaries, you can visit React class-based Error boundaries.
A much more simple way to create your own error boundaries is by installing a simple reusable react error boundary component. We start by installing the react error boundary into our react app.
npm i react-error-boundary
We then create an error function, then we simply wrap our component with the ErrorBoundary component and pass in our fallback component to the FallbackComponent prop so that if there’s an error (that can be caught and handled by react-error-boundary), our fallback component will be rendered; otherwise, our component will be rendered:
function App(){
  return (
    <ErrorBoundary
          FallbackComponent={OurFallbackComponent}
      >
          <Images/>
    </ErrorBoundary>
  );
}

const OurFallbackComponent = ({ error, resetErrorBoundary }) => {
  return (
    <div>
      <h1>An error occurred: {error.message}</h1>
      <button onClick={resetErrorBoundary}>Try again</button>
    </div>
  );
};
Conclusion
As we can see, code splitting in a react code doesn't need any extra configuration and it is easy to implement. It helps to increase performance, therefore, increasing user experience.
Also, do well to like and follow for more content, and if you've got any questions or spotted any errors... please do well to leave some feedback as this is my first technical article.